|
DoorSwitch2
Operate switches, open gates and garage doors, read switches and/or detect closing doors and gates with limit switches, via WiFi, even without the Internet, also for MQTT HTTP automation
|
DoorSwitch is basically an extended version of
DoorOpen.
With
DoorOpen (for more info click here) you can control an existing electric lock (a garage door, locker gate, etc.); with
DoorSwitch2 you can operate
2 locks or 2 switches (2 switches, 2 locks / garage / etc. or 1 and 1, as desired) and in addition you can connect up to 2 limit switches or 2 switches, photocells or buttons (connect to F1 + F1- or F2 + F2-, a basic limit switch is a switch that can be open or closed / short circuit, and DoorSwitch "senses" whether the switch is open or closed).
Everything can be controlled with a PC, a Mac or any Smartphone, and without having to install any boring APP!
There is a lot to say about the limit switches, switches or photocells that DoorSwitch can read ... they can be used for generic applications; there are a thousand possible uses. We mention one: for all those gates or garages that are operated with a single button, a limit switch is usually put in place to know if the garage is closed; configuring the switch, the Web interface thus displays it closed, which is a very useful thing if the gate or garage is not in sight and you don't remember if you closed it or not.
If MQTT is activated, an MQTT message is sent when the F1 F2 inputs status change for the switches, so that even a HUB or Home Assistant can possibly do things (a possible application: say to ControlHUB or another HUB / Assistant that if the gate is open and it is 10 pm, it closes it - very useful for not forgetting the garage or the gate opened...).
As for DoorOpen, connecting it to a WiFi / Internet there are more functions and you can use it for automation and home automation, but to use it, it is not necessary to have the Internet, as it creates its own WiFi and its own site (wfeasy.com). In short, it can be used independently, in complete confidentiality and security (to open doors and/or operate the switches you need to know the DoorSwitch WiFi password, otherwise there is no way! There is also a reset button if you forget the password).
(example of DoorSwitch main screen when connected to a door on Relay1 and as a switch on Relay2)
Applications and benefits
A schematic to summarize everything:
so it can:
- turn things on / off (users up to 220V / 10A, from light bulb to fan conditioner to anything ...)
- open electric locks, doors, gates, gates and garages, or anything else where an opening pulse is needed (adjustable pulse width)
- replace or combine remote controls
- detect if doors, gates and garages are open or closed, using "limit switches"
- detect up to 2 limit switches or photocells, or other switches, for general applications
- provide remote access to apartments rented with AirBnB, Booking, VRBO HomeAway, etc. maybe without even giving the keys, or for example. without giving the keys to the external door (and therefore having to change them, make copies, etc.)
- automate house locks or lights - so that eg. just have your smartphone behind and you can even forget keys or remote controls
- it can be used with an automation / home automation with HTTP or with
MQTT to operate switches or doors / gates or any other use
with various HUB / Home Assistants (
HTTP / MQTT details...)
- exists in 5V..6V version and 5..12V version (from 5 to 12V, therefore it also includes 9V 10V); if you drive locks, you will find it convenient to see what voltage the existing power supply supplies so that the same supply can also be used to power DoorSwitch - given the minimum absorption; many locks are 12V AC. some at 12V C.C. or 6V AC o C.C .; it can be also powered by a common USB charger for mobile phones
- can be used with any PC (even very old) or MAC or Linux or Android or iOS smartphone without having to install any App (just the browser you already use to surf the Internet)
Contacts
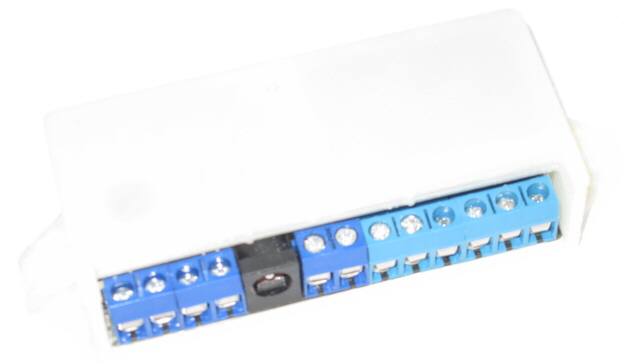
The inputs for 2 limit switches are available (or switches or buttons or photocells; in any case, a change of state from open to closed can be communicated via MQTT for an automation), and the outputs of 2 relays that can directly drive electric locks, or "emulate" / parallel the operation of a button (for interphones or opening systems such as garages, gates, etc.) with adjustable pulse, or act as on / off switches (ON / OFF) for any electrical equipment, from light bulb to fridge (maximum 220/240 Volt AC, 10 Ampere)

For the F1 and F2 limit switches / switches / photocell, DoorSwitch2 detects whether the two wires of each limit switch are disconnected or in contact with each other (= short-circuited): in the settings it is possible to decide, for example, that the F1 limit switch in short circuit means "door closed" or "garage closed" and this is displayed on the screen. Or they can be left OFF (their status will be communicated anyway in MQTT but it will not be supposed to indicate the status of a door or gate).
The relays can be used as switches or "impulse" switches, therefore to turn devices on or off (from a simple light bulb to anything else) or to give opening pulses for doors, gates, garages, gates, etc.
EXAMPLE: To give an example, let's see the connection for direct use with single lock with relay 1, for the version of DoorSwitch that supports 5..12V:
Connection for direct single lock use with relay 2 (for DoorSwitch version supporting 5..12V):
Many other schemes can be made, from the contact legend above there is everything you need to know.
For example "normally open relay 1" and "common relay 1" can go in parallel with an existing "door release" button.
Ditto for the 2.
In general, the power supplies for the locks and intercoms are alternating current, 12V or 6V, in this case the polarity of the wires does not matter.
If, on the other hand, you have a DC power supply, you will have to respect the + for the lock, if it requires it; for the rest DoorSwitch could still work even if you connect it to the terminals provided for Alternating Current, in any order but it is better to use the DC connector. 5.5mm with central + POSITIVE and external -NEGATIVE / GND.
In addition, a 5.5mm USB cable (included) can also be used to power it:
We repeat that the device may also be "connected", but basically it does not need an Internet / WiFi connection and / or be connected to some cloud so:
- it always works: even during Internet or cloud outages;
- it is private and safe: if not connected to the Internet, no hacker or any government agent (ours or abroad) will be able to open the door or operate the switch from the Internet, and not even any geek kid. Likewise, no one will be able to see when someone enters or leaves;
Obviously it's up to you to choose a difficult password for WiFi, if you put "mickey" as the password, or the phone number that is on the guide next to the address ... then you can't complain!! Your phone will memorize it so you can choose a difficult one.
For the more skilled on the technical side, it can be used in an industrial or home automation system since
to "command" it is enough to request simple URLs in http// format or it works with
MQTT and therefore interfaces with many existing automation systems and Home Assistant (including
ControlHUB).

|
Quick manual for DoorSwitch2
First you will need to physically install the device; do it yourself if you are practical, otherwise get help from an electrician.
You can use both switches / relays or even just 1. Same for the limit switches = inputs F1 / F2.
A. TO CONNECT AND OPEN GARAGE DOORS OR ACTIVATE SWITCHES WHEN IT IS ALREADY CONFIGURED
1) connect to WiFi wfeasy.com - the initial password is visualvision
2) connect with the browser (Chrome, Firefox, Safari etc.) to the wfeasy.com site, if you want you can use the QR:
3) one of the pages below appears immediately, depending on how it is configured. In the first figure, the limit switches are not used, relay 1 is used for a gate lock with impulse command, relay 2 is used for an on / off switch
in the figure below, instead, relay 1 is used to open the house door (with impulse command; the limit switch contacts can possibly be used for other things and the state of the contacts is shown on the side of the padlock), relay 2 is used to open the gate, and a limit switch has been placed in the gate (to detect if it is opened or closed)
when the gate is closed, if you have installed everything correctly DoorSwitch understands it by reading the limit switch, and displays this way (note the second padlock closed because the gate is closed):
this is the screen when both relays are used as switches (the detected status of the limit switches/photocells/switches connected to F1 F2 is also displayed alongside):
B. CHANGE THE PASSWORD AND POSSIBLE CONNECTION TO HOME / OFFICE / ETC.
1) connect etc. as in point A
2) enter the password in the "Service" box (the standard one is pippo - change it asap!); the configuration page appears; at the top you can choose the language and do a Reset
3) immediately below, you can connect eg. at home (or office or whatever) WiFi; to do this, select the WiFi, enter the relative password, "Save" (sometimes it disconnects here; just reconnect)
When you are connected to an external WiFi, at the bottom it displays the name of the WiFi and the IP with which the lock can be accessed from that WiFi (if the firewall allows it!).
C. DEFINE SWITCHES OR OPENING DOORS / GARAGES / GATES AND POSSIBLE LIMIT SWITCHES BEHAVIOR
1) connect and enter the Service menu, as in point B
2) below in the page you can define the operating parameters:
As for the parameters, "Unit name" is the name you give to the DoorSwitch (in case you have several it will be used to distinguish); WiFi / User Password and Service Password are the passwords (in the image the standard ones);
"RY1 - Opening pulse" is the duration of the impulse used by the possible lock to open, normally 1 or 2. The "Switch Mode" option is also available which can be used both for particular locks that must always be ON to remain open, or to use one or more DoorSwitch relays as switches (to turn on a light bulb, a machine, a fridge or other ...).
"RY2 - Opening pulse" is the same for relay 2.
"F1 + F1-" Here you choose the use for limit switch 1 (terminals F1 + F1-). If OFF, the "status" of the limit switch (0 or 1) is not used by DoorSwitch, but will still be communicated in MQTT if it changes; if the "CLOSED option corresponds to F + F- in d.c." is chosen, the icons on the home page will change according to whether the limit switch is in DC or not. (see figures above in the examples of point B); the same for the other option "OPEN corresponds to F + F- in d.c."
"F2 + F2-" like F1 + F1- but for the limit switch 2.
D. USE IT WITH MQTT
The easiest way to use DoorSwitch2, even with automation, is to use web/HTTP commands (eg wfeasy.com/?d=3 or (IP address) /? D = 3 or 4 open / close, 33 or 34 turn off when in "mode" switch / switch ", similar to DoorOpen) but MQTT is very popular for automation and in particular for home automation and Home Assistants, and is very useful if you need to do actions related to the status of the limit switches / inputs / switches / photocells, therefore the we inserted it, click here for the page with DoorSwitch2's MQTT manual...
E. ACCESS THE LOCK WITH THE HOME / OFFICE / ETC. WiFi.
1) connect etc. as in point B
2) in the settings set the WiFi name and password always as in point B
3) at the bottom of the window, it will indicate the IP it assumes, eg. 192.168.1.14
4) at this point connected to the WiFi at home / office / lab / whatever ...
5) click the link at the bottom of the window (above) or type the IP in the browser bar, for example 192.168.1.14 or http://192.168.1.14
If this does not work, adjust the firewall of the router or PC so that it stops blocking.
|
Get DoorSwitch2
Dimensions around 95x37x20mm; distance between the fixing holes 86mm.
Power supply depending on the version: from 5 to 6V or from 5 to 12V (with the possibility of using DC or AC; in particular if you drive locks/garages/etc. it is often possible to take the voltage from the existing power supply).
In any case, it can be powered with a USB charger or any other DC 5V power supply.
Absorption at rest <100mA; maximum about 200mA.
Languages for the user interface: English, Français, Italiano, Español, Deutsche.
Made in Italy!

PayPal or Credit Card
Purchase by using the following button and adding to the PayPal cart (where you can change the quantity).
There is a slight surcharge that covers the PayPal fees, and instead a discount in the case of the purchase with bank transfer (below).
Version:
[availble soon]
(C) 2022 VisualVision